Integrating Canvas With SWEAP (LTI 1.3)
The site below is not a comprehensive guide to use of the Canvas LMS, and our team can only assist with SWEAP integration. we are unable to provide support for any other aspect of Infrastructure’s functionality. Screenshots are provided for illustrative purposes but may not exactly match your own system, particularly since navigation elements can vary depending on your version of the platform.
SWEAP is capable of integrating with the Canvas Learning Management system via the external apps feature. For privacy concerns SWEAP is designed to work without the explicit need to send name or student email to our system, however if the identified version of the curriculum instrument is selected, the names will not appear. SWEAP recognizes that every program is different, and we suggest that you consult with your institution’s IT policies and procedures.
If you require the deprecated older versions of the documentation, it is available here: Integrate SWEAP with Canvas (LTI 1.1)
Adding Module Or Assignment To Canvas
- Ensure that the app has been marked as installed by your administrator.
- In canvas navigate to your course where you would like to integrate the selected SWEAP instrument. Click on Assignments, then Add
 .
.
You will want to always create a new assignment instead of editing an assignment if you have an issue as a newly added integration will not be available. - Enter a name and a description for the assignment, for example SWEAP BSW Curriculum Assessment or MSW Advanced Standing Assessment
- Select Submission Type and pick External Tools.
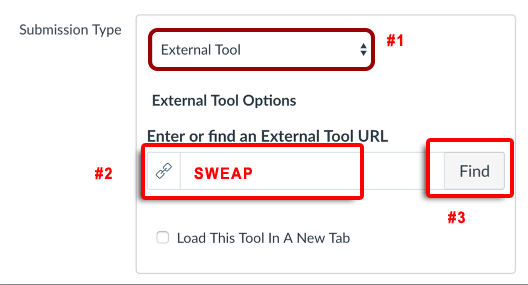
- Under URL enter SWEAP, then find. Pick SWEAP from the list that appears. If it does not appear, ensure that placements under Admin >> Developer Keys >> SWEAP has Assignment Selection enabled, or ensure that the tool has been enabled by your admininstrator. The Canvas administrator documents are available here.
- Add any additional constraints, such as grades or time available for the assignment.
- If grading is enabled, when a learner completes an assessment, SWEAP will send a 100% to Canvas. SWEAP always sends 100%, We do not send the raw student achievement score to Canvas, see guide here: SWEAP is not an Exit or Entrance Exam.
The program determines the value of the SWEAP instrument completion towards the student grade.
- If grading is enabled, when a learner completes an assessment, SWEAP will send a 100% to Canvas. SWEAP always sends 100%, We do not send the raw student achievement score to Canvas, see guide here: SWEAP is not an Exit or Entrance Exam.
- Press Save and Publish
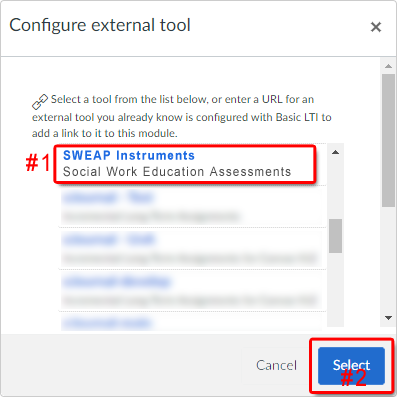
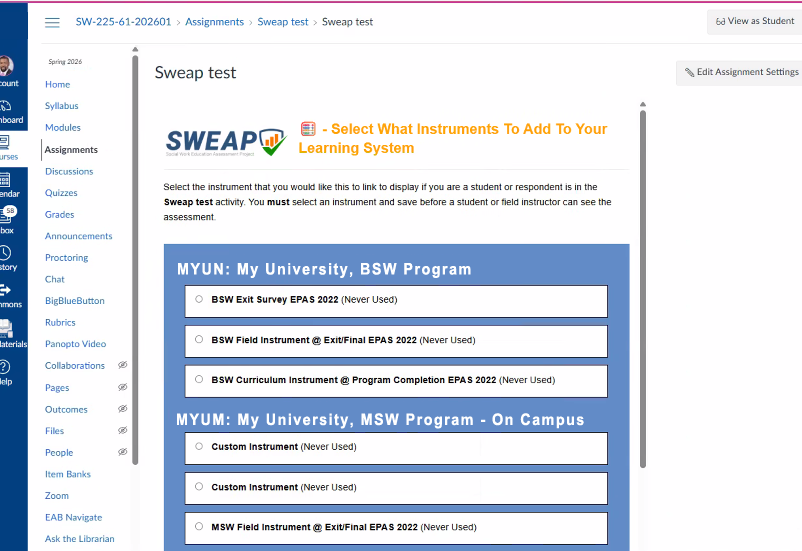
- After saving a screen will appear to allow you to select what instrument you would like to be administered for this assignment.
- After saving you will see a confirmation screen:
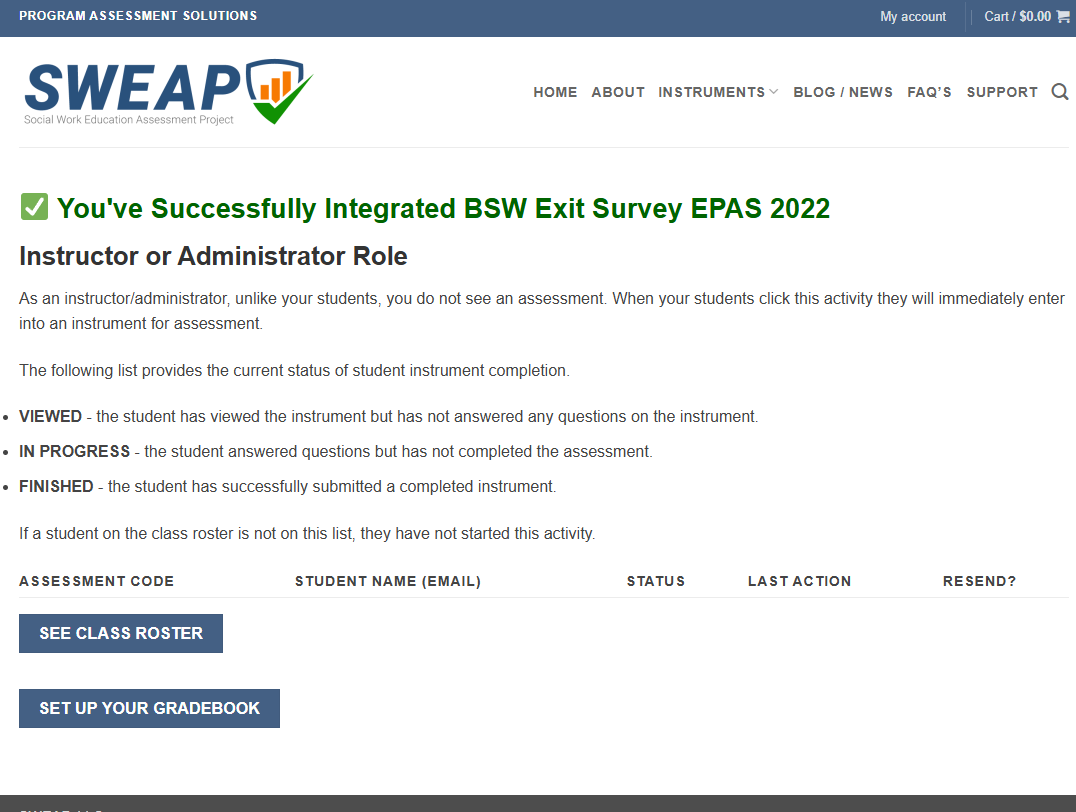
- You are done!
Create Developer Key (Canvas Administrator Settings)
This section applies to the first time setup of the integration with SWEAP. After the one-time tool has been set up with the instructions below, it is enabled for all users of that institution.
-
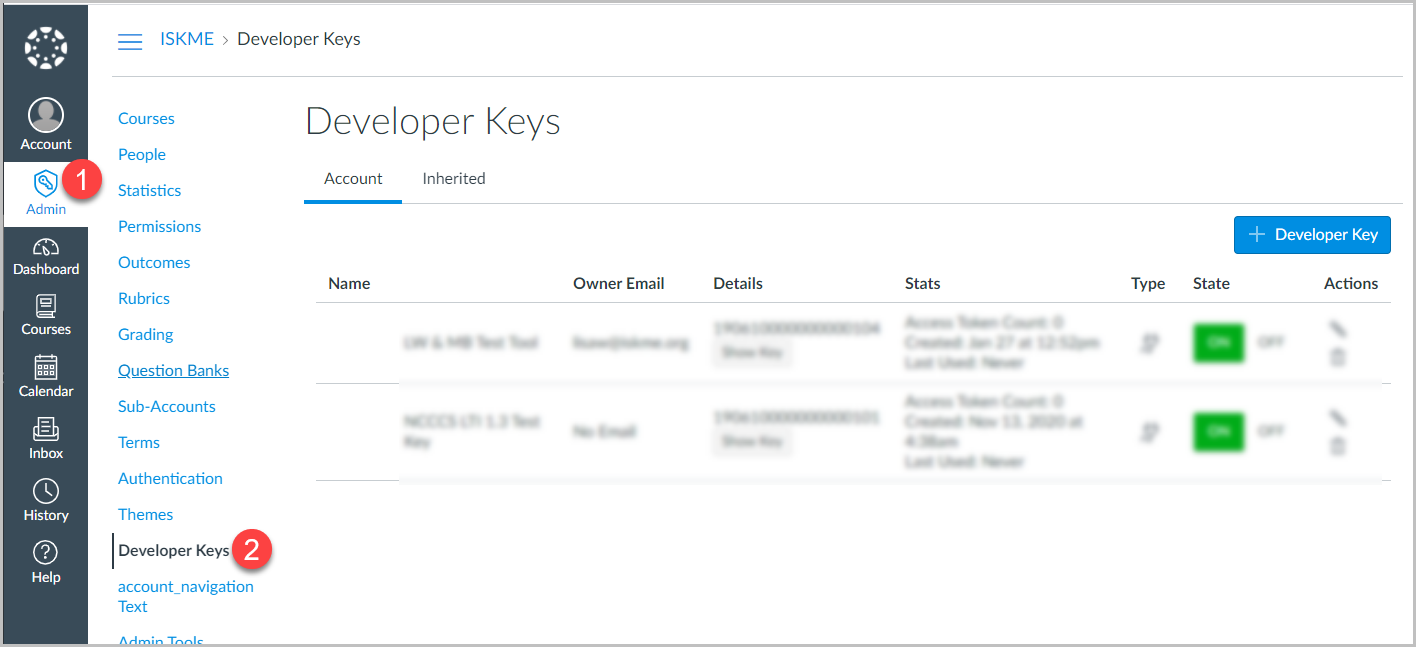
As the LMS Administrator, log in to Canvas and select Admin from the left navigation.
-
Click Developer Keys from the inner left navigation.

-
Select the blue Developer Keys button. Choose LTI Key from the dropdown menu, then Key Settings screen, enter the required information.

- Enter SWEAP Instruments for the name
- Enter Social Work Education Assessments for the description.
- For Redirect URI, enter https://sweapinstruments.org/lti/lti
- For Method, choose Manual Entry.
- Title is the name of the LTI 1.3 tool that you will send to instructors so they can add use the tool in their course.
- For the Target Link URI, enter https://sweapinstruments.org/lti/lti
- For OpenID Connection Initiation Url, enter the value https://sweapinstruments.org/lti/lti
- For JWK Method, choose Public JWKor use JWK URL of https://www.sweapinstruments.org/lti/lti/canvas
- If you’re using the Public JWK option, enter the value in the JWK box.
{"kty":"RSA","n":"hIuhwulpfAXYMEIJHDY7Yrj9SWpH5X3nR4Z8luY46iKFjcqQ51GZWs-XyFkonjsLBJr6TGK0RPN0vgMS7DjwLaEDHzN61swYJ5II9cdDyTh-OZGenuWlHXQHsF3NQt4y0totMRmaY9hMddHPeTuWnrpW1gkhtmxajQGPQ_qaI8Kir89nefr-aO3z3QDNEY0uN3aTsdV_i3I5c7dr-q_9O-iEMngU5YMNd8QyH1MLZqFPZu94_b24_LyGiRqkGd1gCvaE1alpNav7bd6d00dLcRZqWGU6yKQjyLO_Kz_2veKBkpotyQlcE4nbv__6OS_-pb3GtZtXZPoJD6YWR08JUw","e":"AQAB","alg":"RS256","use":"sig","kid":"key-1"}
- If you’re using the Public JWK option, enter the value in the JWK box.
- Now scroll down to Placements.
- Delete Account Navigation, which is populated by default.
- Enter Editor and then select Assignment Selection to add it beside Link Selection.

- All URLs are https://sweapinstruments.org/lti/lti

Get The Client ID For Developer Key
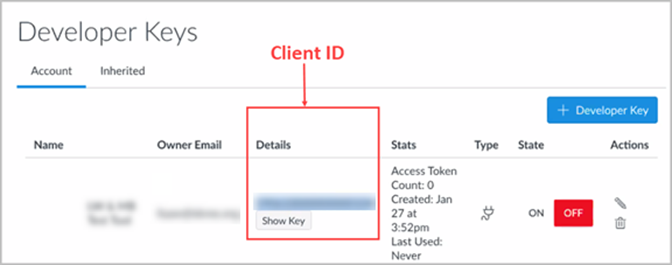
- After you save the Key Settings screen, you will go back to the Developer Keys screen. Alternatively, log in to Canvas, select Admin from the left navigation, and select Developer Keys from the inner left navigation.
- Copy the Client ID from the Details column and start an email to the Site administrator who will complete the setup. Copy the value directly above Show Key. Don’t click Show Key to see and copy a longer ID. You want the shorter version.
Record this value for reference later. - Enable the Developer Key.
Install the Tool and Get the Deployment ID
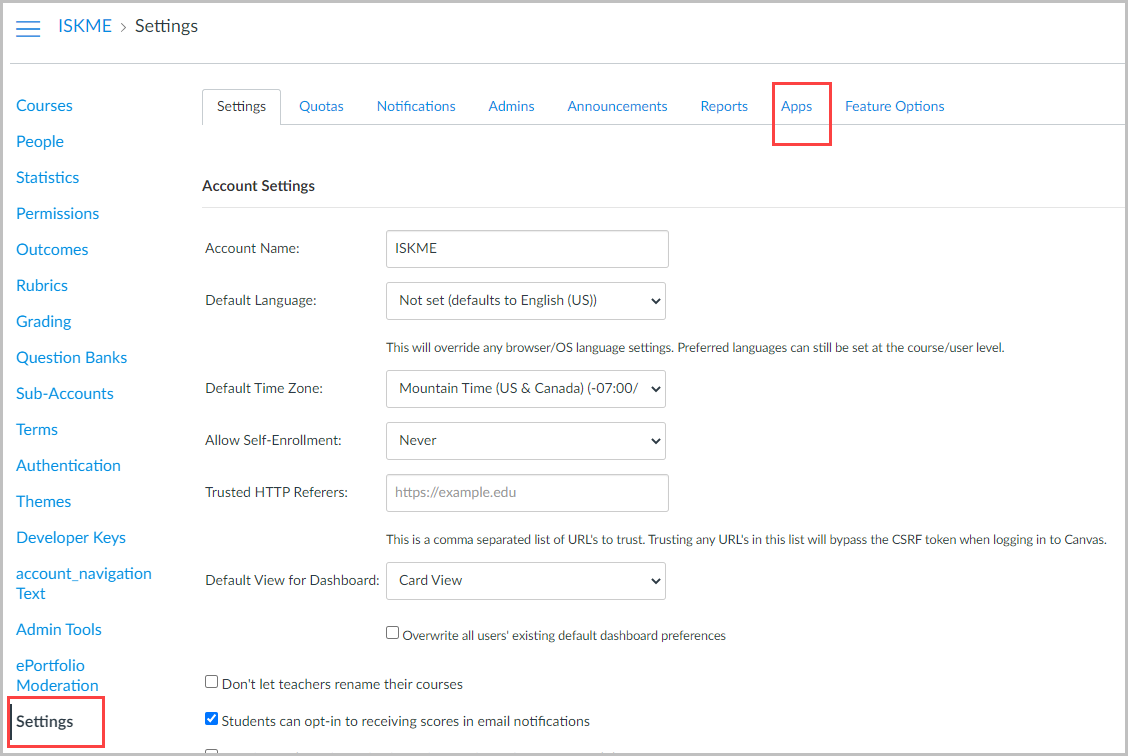
- Log in to Canvas, select Admin from the left navigation, and choose the appropriate account.
- Select Settings from the inner left navigation.
- Select Settings from the inner left navigation, and then select the Apps tab at the top of the screen.
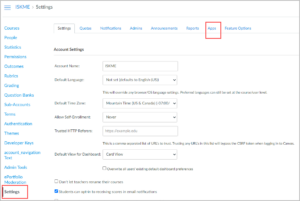
- Click View App Configurations.

- Click + App.

- Select By Client ID.
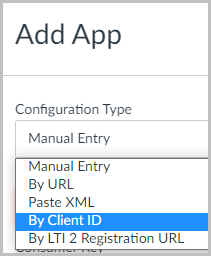
- Enter the Client ID from the “Get The Client ID For Developer Key” step and select Submit.
- Go back to the External Apps screen to get the Deployment ID for the next step.
Select the gear icon associated with the new LTI tool, and choose Deployment ID.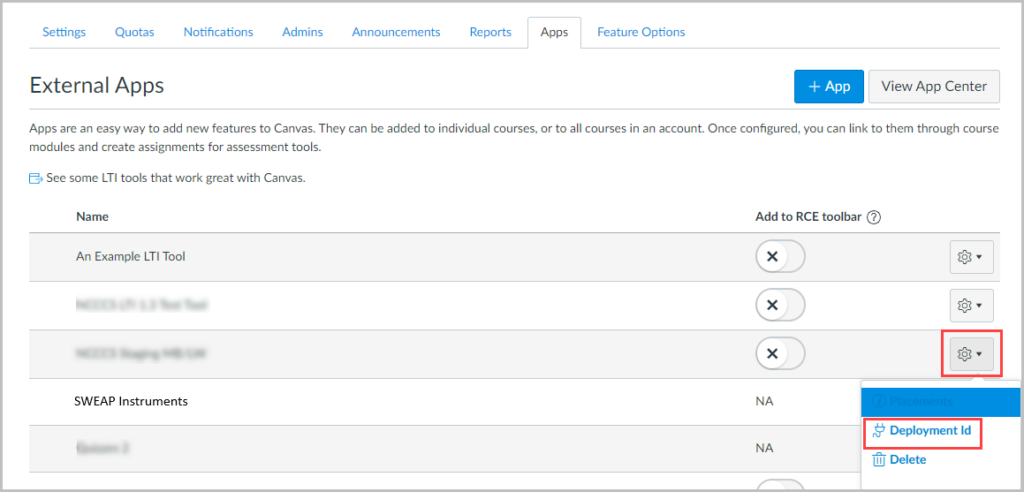


Configure SWEAP To Use Integration
- After getting the Client and Developer ID, you can now authorize the connection from the SWEAP side. Log into SWEAP and then go to The LTI 1.3 Settings Page. To gain access you can follow the instructions here: Adding Access To SWEAP. Alternatively, the following details may be emailed to phil@sweapinstruments.org.
- Click Add New Integration, and fill out the data like so:
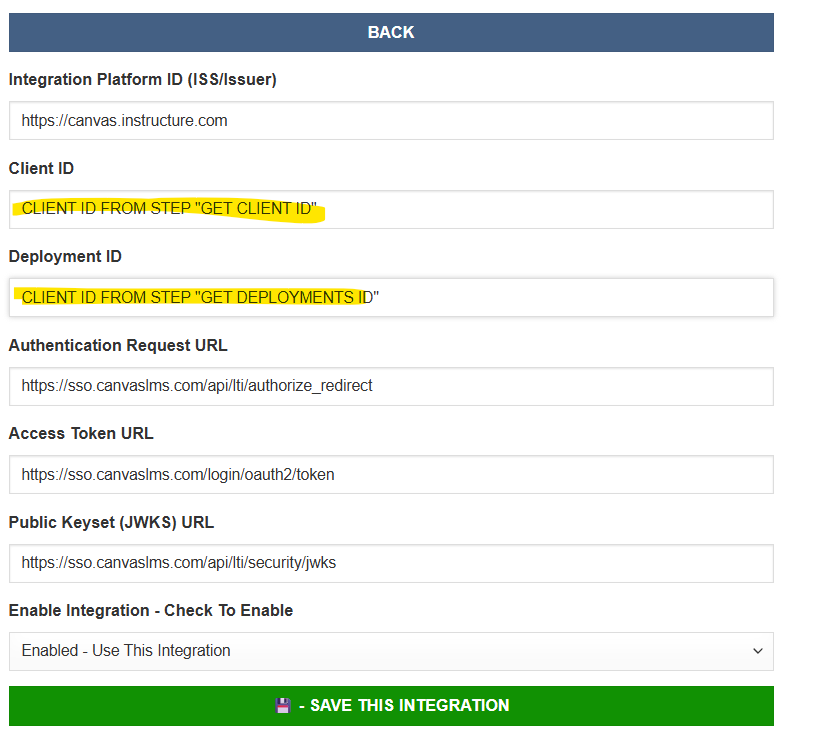
- Note if your institution uses hosted Canvas, the URLS are:
- Platform ID : https://canvas.instructure.com
- Auth Request URL: https://sso.canvaslms.com/api/lti/authorize_redirect
- Access Token URL: https://sso.canvaslms.com/login/oauth2/token
- Public Keyset (JWKS) URL: https://sso.canvaslms.com/api/lti/security/jwks
- Select Enabled – Use This Integration
- Save the integration in SWEAP